My new waterfall and grotto

imageI had a vision for the new pond/waterfall. I penned a ton of inspirational photos onto Pinterest, and I also had it in my head. Definitely a natural look, softened by not having any rectangular shapes.

It’s really not a pond anymore, as much as it is a catch basin for a waterfall with great sound. After a few bumps in the road when attempting to hire the work done by someone else who didn’t understand my vision, Lori and I did the job ourselves.

First, we had to do a little hard work. And by “we”, I mean Lori.

Lori-Jackhammer


Since I had so many problems with my previous pond leaking, we made sure we did it right. Once the area was excavated into the shape we wanted, we laid carpet over all the sharp edges and rocks. Lori decided to take a break at this point.

Lori-Carpet-Pond


Next came the heavy duty liner on top of the carpet.


Pond-liner

And then we created the falls with large rocks. This time the liner went completely under the falls, which is different than the last one was. That one was made before the era of youtube and the internet, meaning we had no idea what we were doing.

Pond-Falls

Next, we just started stacking rocks around the edges, cutting off extra liner, and doubling the liner underneath some rocks on the edge.


Of note in the photo below – see that top rock that is more white than the others, larger, and with a flattened top? That’s actually not a rock! I need something to cover the water spill tank, and I ordered this “faux rock” online. In person, it is so realistic that no one has ever suspected otherwise. You can see in the photo following that I stacked other rocks on top of it to blend it in.

imageIt was almost cathartic lifting and toting these huge limestone rocks and letting them shape themselves into a grotto like you might see it at Pedernales falls. (A beautiful natural formation in the aquifer basins of Central Texas). Just what I wanted!

pond-2


pond-3

In the background of these photos, notice the beautiful painted fence and what a great backdrop it creates for some of the structural plants and shrubs. I’m loving that change the most. The before and after of the fence painting and plantings are in this post.

image

The waterfall grotto is now connected to a raised bed behind it, where I put all of my favorite bearded Iris. The entire grouping now makes sense in the yard, instead of being a random island of plants disconnected from everything else.

pond-1

I’m loving my backyard redo! I’m finally getting happy with my yard, something that’s hard for this malcontent to say!


Inside Austin Gardens Tour, 2014

Lori Daul's inviting garden is a Gardener's Garden.

Lori Daul’s inviting garden is a Gardener’s Garden.

Austin Garden Bloggers sometimes get to do some pretty cool things. Things that make me feel special, which is always a good deal. This time we all got a preview of the upcoming Inside Austin Gardens Tour. The tour is open for public viewing soon – May 3 to be exact – and you can find out where to buy tickets here.

Dugie & David Graham’s Garden with extensive hardscape and water features with native plantings

Dugie & David Graham’s Garden with extensive hardscape and water features with native plantings


The tour includes gardens to explore, continuous one-on-one educational offerings, kids’ activities, and book sales.

Jerry Naiser’s manicured garden is hot, hot, hot!

Jerry Naiser’s manicured garden is hot, hot, hot!

The tour is presented by Travis County Master Gardeners Association and the Texas A&M AgriLife Extension Service. 


Lori Daul’s garden makes beautiful use of a narrow side entrance, something many of us contend with.

This year’s theme is “Gardens Eclectic” and it is certainly fulfilling that concept. You will find something that tickles your fancy, no matter your style. And everything is do-able on a normal budget, rather than the high-dollar designer landscapes that are often on garden tours.

Passionvine in Austin Neal’s creative contemporary garden

Passionvine in Austin Neal’s creative contemporary garden

Lori Daul has a head for design. Or 3, as it were.

Lori Daul has a head for design. Or 3, as it were.


Enjoy Austin gardens before the summer heat wilts us along with the flowers. May 3, put it on your calendar now!

Ken and Robin Howard Moore have plants you may not find elsewhere in Austin

Ken and Robin Howard Moore have plants you may not find elsewhere in Austin


Stock tanks are a brilliant design feature, and Lori Daul makes liberal use of them in her gardens

Stock tanks are a brilliant design feature, and Lori Daul makes liberal use of them in her gardens


Lori Daul's artistic eye shows in her unique water feature

Lori’s artistic eye shows in her unique water feature


Lori Daul's very healthy drought tolerant lawn that is her own creative mix of St. Augustine, sedge, and .... mint!

Lori Daul’s very healthy drought tolerant lawn that is her own creative mix of St. Augustine, sedge, and …. mint!

Backyard Makeover, The Plan

It all started with a rotted board in the deck. What could have been a fairly minor deck repair has morphed into a total backyard makeover. Well, that’s gardening, right?

My 30-year-old deck has been repaired almost every year for the past 10 years. When I stepped through a rotten board last fall, I knew it was time to stop patching and make major changes.*

hole-in-deck-WEB

Here’s how the thought process went. See if you relate!

The deck is rotten underneath in the structural area. It isn’t safe.

I really want a screened-in porch to enjoy the yard.

When I imagine myself sitting in the new porch, I realize there is nothing I want to look at. I’m frustrated with the state of the backyard that used to feel so private. Over the years, Photinias that screened the neighbors died, 3 huge Lady Banks roses that screened noise from the street died, and I removed several humongous invasive Nandinas that created another screen. There’s no longer the feel of intimacy.

Things look really sparse in the winter, and there is no privacy shrubs anymore.

Things look really sparse in the winter, and there are no privacy shrubs anymore.

So before I added on a porch, I needed an overall plan to create a backyard I’m happy with. This was a new thing – usually I just do one project a year and sorta try to make it coordinate with other stuff already there. Needless to say, that led me to where I am, unhappy with the whole shebang.

I called on a few friends for ideas, friends with better visions than I of outdoor spaces. Oh, boy, that opened a can of worms!

Lori, Gardener of Good and Evil (mostly evil right now, wait till you read the work list below 🙂 ) reminded me that since she has known me, I’ve complained about problems with my pond and waterfall. Truth be told, I’ve had problems with the old poorly-made pond since I moved in 14 years ago. She also noticed something I’ve not publicly complained about, but struggled with when trying to design around – there are too many awkwardly placed egress points from the deck. The pathways limit other uses of the deck. I also realized that once I modified my fence 7 years ago, my privacy has been compromised back here, affecting my enjoyment of the yard more than I was aware.

The plan rapidly became:

1. Completely tear down and remove the existing waterfall.

I won't be sad for this to go. It has involved too many backaches, time and money.

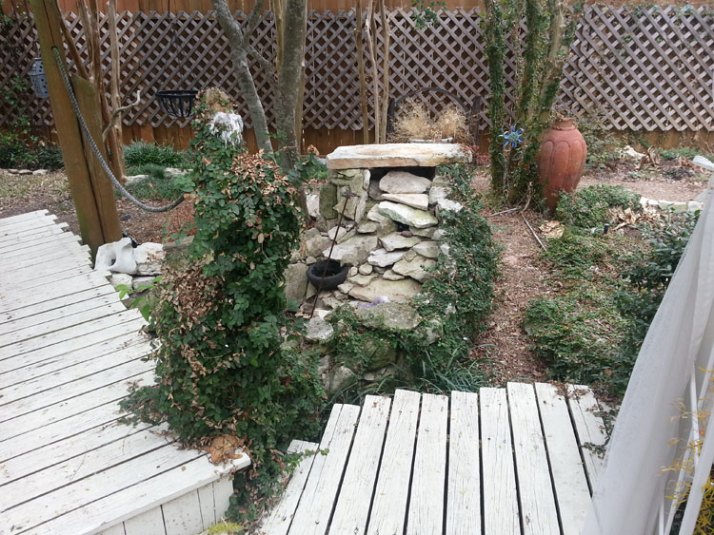
2. Rebuild a new waterfall to integrate it more into the surrounding environment.

3. Remove the old bridge (one egress point) and falling-down nautical-style posts surrounding the bridge.

Before we can remove the bridge, we have to:

4. Create a new appropriately-placed walkway through the old pond area, thus immediately giving that space context that it lacked.

To create the walkway, I have to:

A. Remove a bed.

B. Move a several hundred pound boulder.

C. Dig out a 30-year-old dwarf Yaupon and hopefully move it intact.

That boulder and yaupon have to come out.

D. Remove old deck slats in the way.

To remove the old deck slats, I have to:

i. Empty the garden tool shed so it can be moved out of the way.

ii. Cut off existing deck beams that will interfere.

E. Add steps through the old pond area to create a grand new entrance to the backyard.

This will become a lovely pathway with visual interest.

This will become a lovely pathway with visual interest.

i. Because of the new entrance, I have to create a focal scene as you step into the yard in this area. This involved an area that had never been touched in at least 20 years. Sigh. All the other completed areas over the years and the one area that hadn’t been touched now becomes a “must do”.

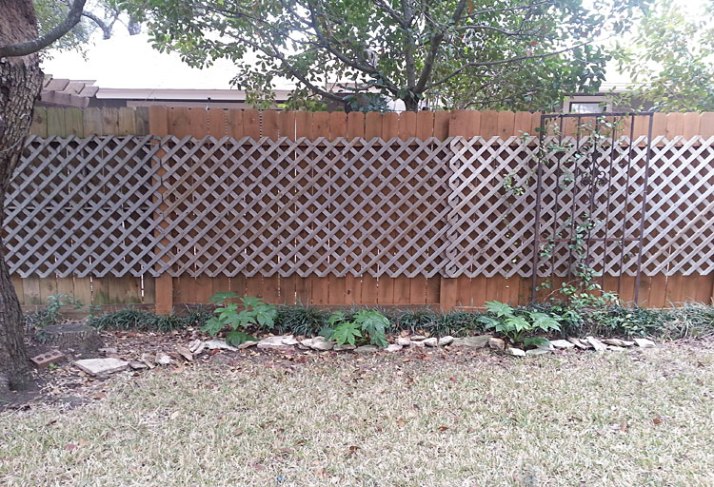
5.  Privacy plants needed to go into the yard asap before summer sets in. But Lori (bless her heart) also noted that the ugly fence (another mistake – I allowed my neighbor to influence the fence style when it was newly put in 7 years ago) needed to be changed. She convinced me that painting it would help me enjoy my plants more and regain an intimate feel to the yard.

A. Before plants could be put in, the fence needed to be painted. This is the phase it’s in right now.

Which leads me to the cool stuff, finally.

If you’ve ever wondered if you should paint your fence, I think these photos will convince you. I knew what color I wanted, so I had a custom color created at Lowe’s. Here’s the before and after.

This is now going to be the first thing you see as you enter a large part of the back yard. Not good.

This is now going to be the first thing you see as you enter a large part of the back yard. Not good.

It’s already dramatically better! Painting the fence and adding Variegated Pittosporum and a couple of pots makes a huge difference while waiting on plants to grow.

I can live with this easily until the plants fill in.

I can live with this easily until the plants fill in.

I connected the new focal area with the rest of the yard with this new bed.

I added the rock edging to  bridge the new focal area and the side bed next to the neighbors.

I added the rock edging to bridge the new focal area and the side daylily bed next to the neighbors.

And after paint – wow, what a difference, right? I think that sculptural dead tree deserves a clematis or equally pretty vine, don’t you?

I absolutely LOVE how this tree can finally be seen. It's always been a favorite and I never knew how to show it off.

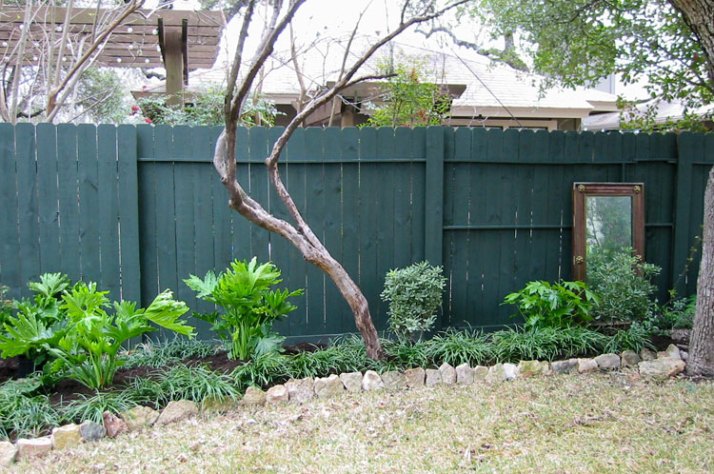
I absolutely LOVE how this tree can finally be seen. It’s always been a favorite and I never knew how to show it off.

*Note: Nothing on that list fixes the deck, which is where this problem started. Isn’t that how it goes? I’ll make it safe to use this year, and a new patio/deck will become next year’s project after the plants have gotten a bit more established. The deck footprint will change accordingly then. Who knows, maybe I’ll get a screened-in porch?

The new view as you enter from the new entrance:

backyard-entrance-view-WEB

When those Pittosporum and Aralia grow, that’s going to look so lush! I’m hoping it will screen the backyard neighbors’ many structures.
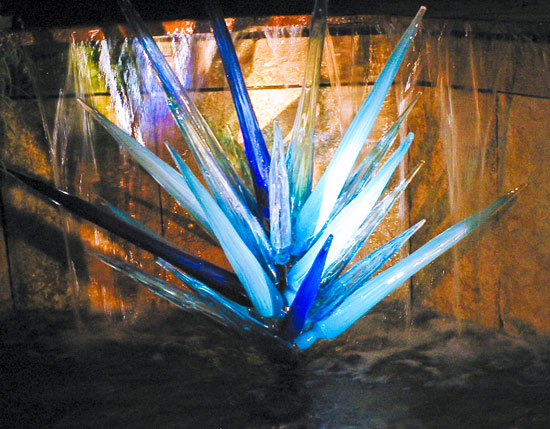
Back in the Saddle

2011 just about did me in. It was a six-month-long summer from hell, beyond any heat and drought imaginable. I am strongly affected by the weather, and that year drove me to resent where I lived. I didn’t go outside for 5 long months – May through September. Everything in the yard was dying or struggling, including decades-old oaks and elms. I gave up gardening then. Never had I worked so hard for such meager rewards.

20100109_viburnum

Many things bit the dust in 2011.

Subsequently, in 2012, I posted about things other than gardening, and then, finally, nothing at all. I got very busy with a new job venture, and gardening went by the wayside other than maintenance.

Then the maintenance became too much – too hot, too expensive, too much to do every year. In my efforts to create a lovely native landscape, my water bills went up, my mulch bill skyrocketed, and now I had to pay the lawnmowers PLUS trim a bunch of native plants. More work and not enough enjoyment. I had begun to hate my yard.

I decided last summer that the winter projects this year are all intended to make the yard look better with less maintenance. That means less perennials to cut back twice a year. That means more tough evergreens that don’t need to be babied.

Pretty, but too much work to maintain.

Pretty, but too much work to maintain.

To accommodate this, the plants in the front yard Stop Sign bed played “musical chairs” in the fall. Things that were overgrown were either yanked out or moved. I only kept the perennials that I really, really liked.  For me, that short list is Pride of Barbados (one of the reasons I created the bed was so I could grow this), Esperanza, Moy Grande Hibiscus, Lantana and fall Aster.

Everything else now in the bed is either evergreen or a bulb/tuber (Iris, Society Garlic, Creme de Menthe Pittosporum, daylilies, Lambs Ears, Crape Myrtle, Mountain Laurel, Color Guard Yucca, Hardy Ice Plant).   Pics to come later when things start to green up, right now it is just a bunch of sticks.

Secondly, all the front beds were finally – at long last – finished off with limestone edging. The existing black plastic edging that was SUPPOSED to be temporary ended up being there over five years. So glad to see that gone.

front-before-edging-WEB

BEFORE: The beds don’t have a good transition between the grass, and they are so empty in the winter with the perennials that I was using. They’re gone now, to be replaced soon by low maintenance evergreens.

So much better! Once the new plants are in place, I'll put this bed to rest for a while with some mulch and weekly watering.

AFTER Stage One: So much better already! Once the new plants are in place, I’ll put this bed to rest for a while with some mulch and weekly watering.

Good friend and tough love landscape designer Lori, Gardener of Good and Evil, reminded me to “plant what works”. Somehow I was finally ready to hear the advice: stop trying to create the landscaping of my dreams that doesn’t grow here. I can never have lush, acid-loving plants like hydrangeas, camellias, azaleas, lilac and more. It finally sunk in that I have to observe what can survive in Central Texas harsh environments and put in more of those things. Loropatelum ZhuZhou (more upright and easily pruned to a small tree than other varieties) is one of those, so it was added where I need some height by the front entrance. It grows quickly, so hopefully it will own that spot soon. I’ll soon add Pittosporum, Aralia, Color Guard Yucca and non-invasive Firepower Nandina to populate this bed. It will give me a consistent look, winter and summer, and is very low maintenance. (Yes!) 

There’s so much more to come. I’ll be blogging over the next few months – the re-do to create less maintenance has morphed into a complete makeover, front and back. It’s fun, I’m enjoying it, and hopefully I can continue to enjoy gardening again as I learn to stop trying to push the river.